(Devenir Membre)
   
Menu
 Le Site
 Le Forum

 
Site optimisé pour :

Qui est en ligne ?
» 0 Membre(s)
» 6 Invité(s)


[ Voir toute la liste ]

Vus dernièrement :
 
Statistiques
Sur le Forum ZenZone

Membres : 3774
Dernier Inscrit :

nicolas78

79617 Messages
dans 9887 Sujets.
 
ZenZone IRC

Pseudo :

 
{SE7EN} Centralisation de hacks et de How To pour 7
Aller à la page 1, 2  Suivante
   eMule ZenZone Index du Forum -> Systèmes d'exploitation (O.S) -> Windows
{SE7EN} Centralisation de hacks et de How To pour 7 Voir le sujet précédent Voir le sujet suivant 
Auteur Message
goOK
Bouddha Zen
Bouddha Zen


Anniversaire : 04 Juin
Zodiaque: Gémeaux
Sexe: Sexe:Homme
Inscrit le: 22 Déc 2008
Messages: 1779
Localisation: Béhobia, Pais Vasco, Spain


Citer
Posté le: Dim Mar 15, 2009 10:40
Sujet du message: {SE7EN} Centralisation de hacks et de How To pour 7
Répondre en citant


Centralisation de hacks et de How To pour 7


http://pixhost.ws/avaxhome/9b/b8/000bb89b_medium.jpeg


----


http://www.blogsdna.com/wp-content/uploads/2008/06/windows-vienna-7-logo.png


Fix Windows 7 Build 7057 Desktop.ini Opening on Every Reboot


Citation:


Windows 7 Build 7057 has many new changes as well as bug fixes like Windows 7 Beta UAC bug. These changes include a set of new wallpapers, Revamped Logon and shutdown screen, changes in user pictures.

Users who has installed Windows 7 Build 7057 are reporting a startup bug where Desktop.ini Opens in Notepad on Every Boot. Fortunately the fix for this Windows 7 desktop.ini startup bug is very easy. Check out below instructions on how to fix Windows 7 Build 7057 desktop.ini bug.

http://www.blogsdna.com/wp-content/uploads/2009/03/windows-7-build-7057-desktopini-bug.jpg


Fix Windows 7 Build 7057 Desktop.ini Startup Bug

Method :1

1. Navigate to C:\ProgramData\Microsoft\Windows\Start Menu\Programs\Startup

2. Delete desktop.ini

3. Navigate to C:\Users\USERNAME\AppData\Roaming\Microsoft\Windows\Start Menu\Programs\Startup

4. Delete desktop.ini if present.


Method : 2

1. Under Folder Options -> View , select “Show hidden files, folders and drives” and un-check “Hide protected operating system files” so that you can see the hidden desktop.ini files.

2. Open the start orb and at the search type: shell:startup and press Enter. The start menu startup folder will open, where you will find a desktop.ini file. Delete it.

3. Open the start orb and at the search type: shell:common startup and press Enter. The “all users” start menu startup folder will open, where you will find a desktop.ini file. Delete it too.

4. Done. Reboot and the desktop.ini will not appear again.


---

How to Disable & Remove Windows 7 Send Feedback Link Option


http://www.blogsdna.com/wp-content/uploads/2008/12/windows-7-beta-send-feedback-tool.jpg


1. Run Registry Editor (RegEdit), and navigate to the following registry key:

HKEY_CURRENT_USER\Control Panel\Desktop

2. Add in a new DWORD (32-bit) Value named FeedbackToolEnabled, and then set its value data as 0.

3. Log off and log on again for the change to take effect.


http://www.blogsdna.com/wp-content/uploads/2008/12/windows-7-no-send-feedback.jpg


Those who find it difficult to edit registry can download following registry file to merge the value to disable and remove the “Send Feedback” link automatically.

Disable-Feedback-Tool.rar

http://www.ziddu.com/download/2863994/Disable-Feedback-Tool.rar.html


After downloaded the RAR archive, run the Disable-Feedback-Tool.reg inside it.

Source: MyDigitalLife


---


How to Remove Windows 7 Shortcut Extension and Shortcut Arrow Icon


How to Remove Shortcut Extension from Windows 7


1. Click on Start and Type regedit in search bar and press enter (select yes if seen UAC prompt)

2. Navigate to following registry key

HKEY_CURRENT_USER\Software\Microsoft\Windows\CurrentVersion\Explorer

3. Locate “Link” in right pan of registry editor


http://www.blogsdna.com/wp-content/uploads/2009/01/regedit-remove-shortcut-extension.png


4. Double click or right click-> modify to modify registry key

5. Now change the value from 18 00 00 00 to 00 00 00 00 Press ok and exit regedit


http://www.blogsdna.com/wp-content/uploads/2009/01/regedit-remove-shortcut-extension-windows-7.png


Now try to create shortcut on your desktop and it should not show shortcut extension.


---


How to Remove Shortcut Overlay Arrow icon from windows 7

Download this Reg file :

http://www.hulahal.com/Win7/RemoveArrow.zip


and follow readme instruction included within zip file to remove shortcut arrow icon.


http://www.blogsdna.com/wp-content/uploads/2009/01/after-before.png


---


Dernière édition par goOK le Mar Mar 17, 2009 08:38; édité 2 fois
Voir le profil de l'utilisateur Envoyer un message privé Envoyer un e-mail
 
Voir le sujet précédent Voir le sujet suivant 
Auteur Message
goOK
Bouddha Zen
Bouddha Zen


Anniversaire : 04 Juin
Zodiaque: Gémeaux
Sexe: Sexe:Homme
Inscrit le: 22 Déc 2008
Messages: 1779
Localisation: Béhobia, Pais Vasco, Spain


Citer
Posté le: Dim Mar 15, 2009 10:44
Sujet du message:
Répondre en citant


Registry Hack to Enable Aero in Windows 7


http://www.blogsdna.com/wp-content/uploads/2009/01/windows-7-aero-glass.png


1. Click on Start and type regedit at run

2. Now Navigate to the following registry key:

Citation:
HKEY_CURRENT_USER\Software\Microsoft\Windows\DWM


3. In the right details pane, create following Three DWORD (32-bit value) entry

UseMachineCheck, and set its value to 0.

Blur, and set its value to 0.

Animations, and set its value to 0.

4. Close Regedit

5. Click on Start and type CMD with administrative Priviliges

6. Now type following command

Net Stop uxsms

Net Start uxsms

Above command will stop and start Desktop Window Manager Session Manager.

7. Now Attempt to Enable Aero by right clicking on desktop-> Personalize ->Windows Colors.

This Registry Hack to enable Aero in Windows 7 can also be used on Windows 7 install on Virtual Machine like Virtual PC 2007 but this wont work on Vmware Player which doesn’t have DirectX 9 or support physical machine video Drives.


---
Voir le profil de l'utilisateur Envoyer un message privé Envoyer un e-mail
 
Voir le sujet précédent Voir le sujet suivant 
Auteur Message
goOK
Bouddha Zen
Bouddha Zen


Anniversaire : 04 Juin
Zodiaque: Gémeaux
Sexe: Sexe:Homme
Inscrit le: 22 Déc 2008
Messages: 1779
Localisation: Béhobia, Pais Vasco, Spain


Citer
Posté le: Dim Mar 15, 2009 10:47
Sujet du message:
Répondre en citant


http://www.blogsdna.com/wp-content/uploads/2009/01/windows-7-aero-glass-effect.png

How to Enable Aero Glass Effect in Windows 7


1. Once you have finished Installing Windows 7 install updated video drivers for your windows 7

2. Refresh your WEI (Windows Experience Index) Score. In order to refresh WEI right on My Computer -> Properties, A New window with System information will be displayed.


http://www.blogsdna.com/wp-content/uploads/2009/01/window-7-system-information.png


3. Click on Performance Information and Tools at bottom right side of window.


http://www.blogsdna.com/wp-content/uploads/2009/01/refresh-windows-experiance-index.png


4. Now click Re-run the assessment

Or you can simply Click on start->type cmd or Command Prompt-> and type following command

winsat formal

Once your Windows Experience Index is recalculated and if its higher then 3.0, Aero in Windows 7 will get automatically enabled.

You can change colors by righ clicking on desktop-> Personalize -> Select Windows Colors


---


Voir le profil de l'utilisateur Envoyer un message privé Envoyer un e-mail
 
Voir le sujet précédent Voir le sujet suivant 
Auteur Message
goOK
Bouddha Zen
Bouddha Zen


Anniversaire : 04 Juin
Zodiaque: Gémeaux
Sexe: Sexe:Homme
Inscrit le: 22 Déc 2008
Messages: 1779
Localisation: Béhobia, Pais Vasco, Spain


Citer
Posté le: Dim Mar 15, 2009 10:49
Sujet du message:
Répondre en citant


Quickly Unlock & Enable New Aero Shake Taskbar in Windows 7


Steps to Unlock / Enable New Aero Shake Taskbar in Windows 7

1. Download a copy of the Taskbar Unlock Tool for 32Bit or 64Bit and drop it in your Windows directory

http://www.withinwindows.com/files/upf/upf_x86_rev0.zip 32 bit

http://www.withinwindows.com/files/upf/upf_x64_rev0.zip 64 bit

2. Execute the following commands as an Administrator in Command Prompt

3. takeown /f %windir%\explorer.exe

4. cacls %windir%\explorer.exe /E /G MyUserName:F (replacing MyUserName with your username)

5. taskkill /im explorer.exe /f

6. cd %windir%

7. start unlockProtectedFeatures.exe


http://www.blogsdna.com/wp-content/uploads/2008/11/aero-shake-taskbar-in-windows-7.png


Now just re-launch the shell by clicking the Launch button to enjoy New Taskbar.

Please keep in mind that unlocking New Taskbar of windows 7 might not be suggested as it is still broken feature & you may face bugs and problems when using Aero Peek and Jumplists.

Source: Sizlopedia


---

Voir le profil de l'utilisateur Envoyer un message privé Envoyer un e-mail
 
Voir le sujet précédent Voir le sujet suivant 
Auteur Message
goOK
Bouddha Zen
Bouddha Zen


Anniversaire : 04 Juin
Zodiaque: Gémeaux
Sexe: Sexe:Homme
Inscrit le: 22 Déc 2008
Messages: 1779
Localisation: Béhobia, Pais Vasco, Spain


Citer
Posté le: Dim Mar 15, 2009 10:53
Sujet du message:
Répondre en citant


http://www.blogsdna.com/wp-content/uploads/2009/01/windows-7-taskbar-thumbnail-previews.jpg


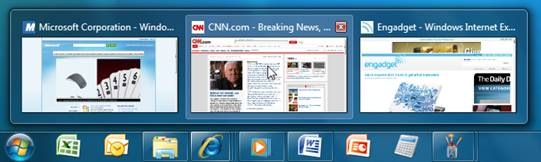
* La barre des tâches, zone située en bas de l'écran et dans laquelle se trouve une vignette (petite miniature) pour chaque application ou fenêtre ouverte. Elle contient également une barre de lancement rapide permettant de placer des raccourcis vers vos applications ou fichiers préférées :

Image Hosted by ImageShack.us

-possibilité d'ajouter des raccourcis où vous souhaitez sur la barre des tâches


Placez la Taskbar où vous voulez !

Il a toujours été possible de déplacer la barre des tâches. Mais son fonctionnement donnait dès lors plutôt l'impression d'être une astuce de dernière minute…

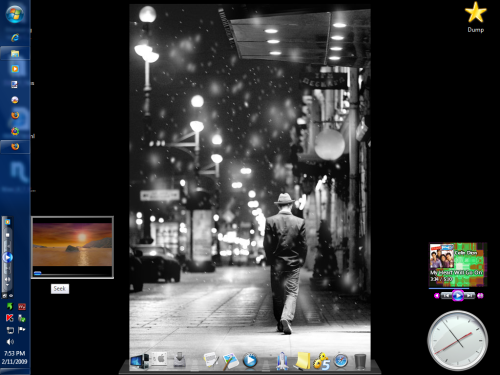
Sous Windows 7, la barre des tâches a été spécialement pensée pour être positionnée aussi bien en bas qu'en haut ou sur les côtés. Son look et son fonctionnement s'adaptent à la position désirée par l'utilisateur. Ainsi, le placement de la barre sur les côtés s'avère particulièrement pratique sur les écrans UltraWide, et notamment sur les écrans 1024x600 des Netbooks où elle occupe trop d'espace en bas et limite la vue des pages Web.

Pour déplacer la barre des tâches:

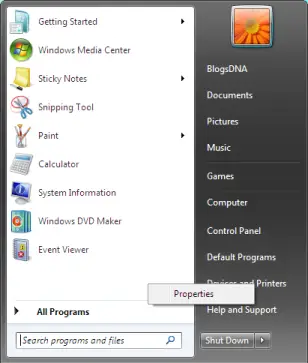
- Cliquez du bouton droit sur une zone vierge de la barre des tâches

- Sélectionnez Properties

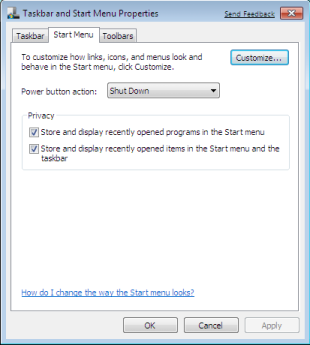
- Vérifiez que l'onglet Taskbar est bien ouvert

- Repérez le menu pop-up "Taskbar location on screen" et sélectionnez:
* Right : Barre positionnée sur la droite de l'écran
* Left : Barre positionnée sur la gauche de l'écran
* Top : Barre positionnée en haut de l'écran
* Bottom : Barre en bas de l'écran (mode par défaut)


http://www.01net.com/img/trucsetastuces/590-5-mea.png


Epinglez applications, fichiers et dossiers !

Vous le savez forcément tous, la barre des tâches a été repensée pour intégrer en un seul et même concept le principe de la barre de lancement rapide et le principe de la gestion des applications lancées.

http://www.01net.com/img/trucsetastuces/590-6-mea.png

On peut donc désormais placer directement un programme que l'on appelle souvent dans la barre des tâches. Il suffit pour cela soit d'y glisser/déposer son icône, soit plus simplement de cliquer du bouton droit sur son icône (dans le menu Tous les programmes) et de sélectionner Pin to Taskbar.

Mais on peut aussi épingler des dossiers. Le concept fonctionne un tout petit peu différemment de ce à quoi on peut s'attendre :

- Imaginez que vous utilisiez très fréquemment un dossier (par exemple, le dossier "Factures").
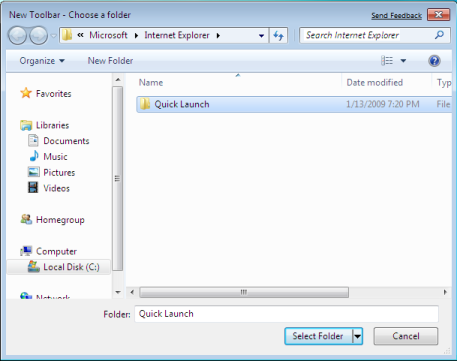
- Ouvrez l'explorateur de fichier (en cliquant sur Computer dans "Démarrer").
- Naviguez jusqu'au fameux dossier en question (dans notre exemple, Factures).
- Cliquez dessus et faites glisser son icône jusqu'à la barre des tâches.
- Notez que la souris indique alors Pin to Windows Explorer.
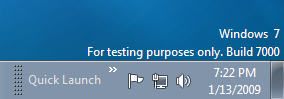
- Lâchez le bouton. Le Dossier n'apparaît pas directement dans la barre des tâches, c'est normal.
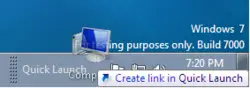
- Cliquez maintenant du bouton droit sur l'icône de l'explorateur pour activer la Jump List
- Notez que le dossier est maintenant épinglé en haut de la Jump List! Pratique, non?

Cette fonction s'avère très pratique pour ainsi épingler des emplacements réseau auxquels on accède très souvent.

Note:

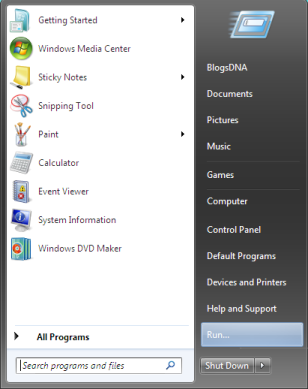
on ne peut pas épingler directement un fichier dans la barre des tâches. En revanche, on peut épingler un fichier auquel on accède tous les jours dans le menu Démarrer. Pour cela, sélectionnez le fichier, puis cliquez dessus du bouton droit en maintenant la touche [Shift] enfoncée. Sélectionnez Pin to Start Menu.


---

Accédez à la barre des tâches par le clavier

Ceux qui utilisent principalement leur PC pour des tâches bureautiques font un usage intensif du clavier et savent à quel point il peut être contraignant d'avoir à déplacer la main pour se saisir de la souris juste pour lancer une application ou appeler une fonction. C'est pour cette raison que Windows possède des raccourcis clavier pour la quasi-totalité des opérations.

Windows 7 introduit un grand nombre de raccourcis nouveaux. L'un d'eux s'avère particulièrement pratique, maintenant que la barre des tâches regroupe autant de nouvelles fonctionnalités...

La combinaison [Windows]+[T] donne automatiquement la main à la barre des tâches. Vous pouvez alors utiliser les touches Curseur pour naviguer entre les applications et entre les vues miniatures. Pour redonner la main à l'application en cours, il suffit de quitter la barre des tâches en appuyant sur la touche [Esc].


---


http://www.01net.com/img/trucsetastuces/590-8-mea.png

Réarranger l'ordre des applications

la nouvelle barre des tâches réunit les rôles de barre de lancement rapide et de barre de gestion des applications ouvertes. Chose que l'on ne pouvait pas faire avant, on peut désormais réordonner les icônes de la barre des tâches, et donc réarranger à son gré les applications ouvertes. Il suffit tout simplement de faire glisser les icônes dans la barre des tâches.


Cette réorganisation offre un intérêt supplémentaire: on peut accéder aux 9 premières icônes de la barre des tâches par un raccourci clavier (d'où l'importance de pouvoir réordonner les icônes afin de placer en premier les neuf programmes les plus importants pour vous).

- Appuyez sur [Windows] + [1] pour lancer l'application en première position
- Appuyez sur [Windows] + [2] pour lancer l'application en deuxième position
- Appuyez sur [Windows] + [3] pour lancer l'application en troisième position
... et ainsi de suite jusqu'à
- Appuyez sur [Windows] + [9] pour lancer l'application en neuvième position.

REMARQUE : Notez que les touches [1] à [9] utilisées ici ne sont pas celles du pavé numérique, mais celles situées sur la rangée supérieure du clavier principal AZERTY.


---


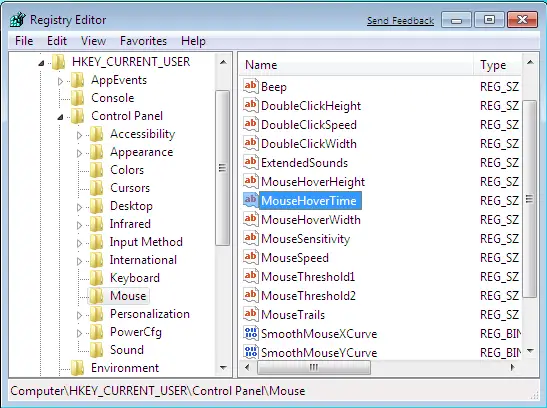
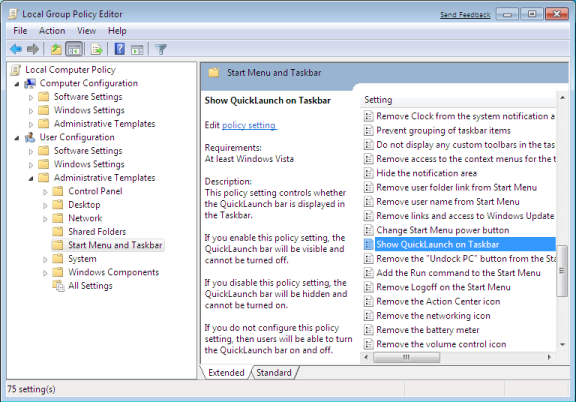
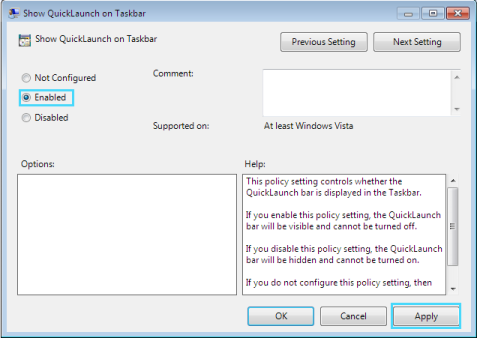
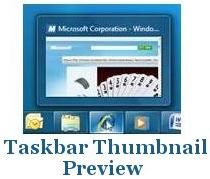
How to Enable or Disable Taskbar Thumbnails Preview in Windows 7


http://www.blogsdna.com/wp-content/uploads/2009/01/taskbar-thumbnail-preview.jpg


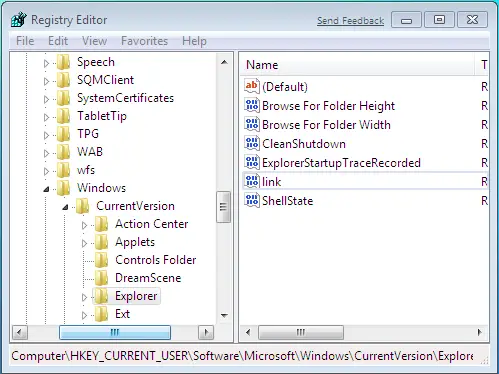
1. Click on start and type on search bar gpedit.msc and press enter

2. Now navigate to User Configuration, Administrative Templates, and Start Menu and Taskbar in left pan of Group Policy Editor


http://www.blogsdna.com/wp-content/uploads/2009/01/turn-off-taskbar-thumbnail-preview.png


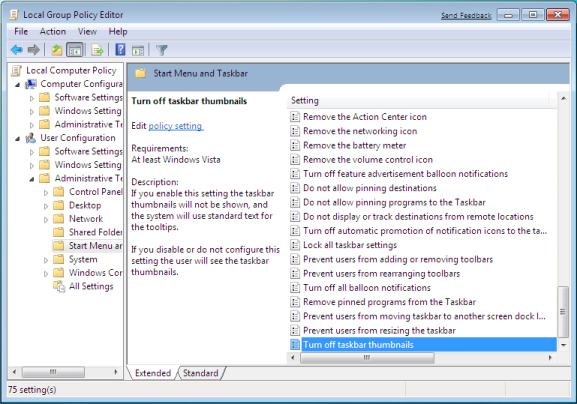
3. Locate “Turn off Taskbar Thumbnails” in right pan of Group policy editor and double click on it.

4. Select Disable click apply and Press ok


http://www.blogsdna.com/wp-content/uploads/2009/01/disable-turn-off-taskbar-thumbnails.png


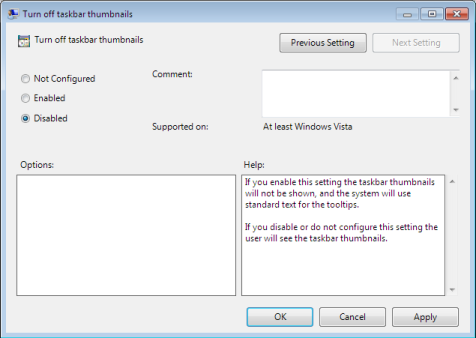
5. Now check your Taskbar, it shouldn’t show Thumbnails Preview .


---


Dernière édition par goOK le Dim Mar 15, 2009 11:04; édité 1 fois
Voir le profil de l'utilisateur Envoyer un message privé Envoyer un e-mail
 
Voir le sujet précédent Voir le sujet suivant 
Auteur Message
goOK
Bouddha Zen
Bouddha Zen


Anniversaire : 04 Juin
Zodiaque: Gémeaux
Sexe: Sexe:Homme
Inscrit le: 22 Déc 2008
Messages: 1779
Localisation: Béhobia, Pais Vasco, Spain


Citer
Posté le: Dim Mar 15, 2009 10:56
Sujet du message:
Répondre en citant


http://www.blogsdna.com/wp-content/uploads/2009/01/windows-7-taskbar-thumbnail-previews.jpg

How to Speed up Taskbar Thumbnail Preview in Windows 7


1. Click on start and type regedit at search bar

2. Navigate to following key in left pan of registry editor

Citation:
HKEY_CURRENT_USER\Control Panel\Mouse


http://www.blogsdna.com/wp-content/uploads/2009/01/speedup-taskbar-thumbnail-preview.png


3. Now locate MouseHoverTime key in right pan of registry editor


http://www.blogsdna.com/wp-content/uploads/2009/01/change-mousehovertime-to-50.png


4. Doublick on MouseHoverTime or right click modify and change value from 400 to any value less then 100 (400 is milliseconds) lower the value faster the thumbnail preview.

5. Click ok and close regedit widow.

Now check taskbar thumbnail preview by hovering mouse on taskbar icon and it should open faster.


http://www.blogsdna.com/wp-content/uploads/2009/01/taskbar-thumbnail-preview.jpg


---

Voir le profil de l'utilisateur Envoyer un message privé Envoyer un e-mail
 
Voir le sujet précédent Voir le sujet suivant 
Auteur Message
goOK
Bouddha Zen
Bouddha Zen


Anniversaire : 04 Juin
Zodiaque: Gémeaux
Sexe: Sexe:Homme
Inscrit le: 22 Déc 2008
Messages: 1779
Localisation: Béhobia, Pais Vasco, Spain


Citer
Posté le: Dim Mar 15, 2009 11:01
Sujet du message:
Répondre en citant


http://www.blogsdna.com/wp-content/uploads/2009/01/add-shortcut-to-quick-launch-toolbar1.png


How to Enable - Disable Quick Launch Toolbar in Windows 7


1. Click on Start and type gpedit.mst at run

2. Now navigate to User Configuration, Administrative Templates, and Start Menu and Taskbar in left pan of group policy edit window.

http://www.blogsdna.com/wp-content/uploads/2009/01/group-policy-editor-for-quicklaunch-on-taskbar.png


3. Now locate Show QuickLaunch on Taskbar in right pan and double click on it.

4. Select Enable click apply and Press ok.


http://www.blogsdna.com/wp-content/uploads/2009/01/enable-quick-launch-toolbar.png


5. Now Right click on Taskbar select Toolbar->New toolbar

6. Navigate to C:\Users\(user name)\AppData\Roaming\Microsoft\Internet Explorer

7. Now SelectFolder Quick Launch


http://www.blogsdna.com/wp-content/uploads/2009/01/add-quick-launch-to-taskbar.png


8. Now You Should see Quick Launch Toolbar on Taskbar


http://www.blogsdna.com/wp-content/uploads/2009/01/quick-launch-toobar-enabled.png


---


How to Add Shortcut to QuickLauch Bar in Windows 7

Click any desktop shortcut and drag on QuickLaunch bar check out below screenshot


http://www.blogsdna.com/wp-content/uploads/2009/01/add-shortcut-to-quick-launch-toolbar.png


You can simply drag Quick Launch at left side towards Start menu to make it look like your windows vista and XP Quick Launch Bar.


http://www.blogsdna.com/wp-content/uploads/2009/01/final-quick-launch-toolbar-at-taskbar-in-windows-7.png


---

Comment activer et organiser la barre de lancement rapide sous Windows 7 (Build 7000)

http://www.jenyburn.com/home/comment-activer-et-organiser-la-barre-de-lancement-rapide-sous-windows-7-build-7000/


---


Dernière édition par goOK le Lun Mar 16, 2009 11:17; édité 1 fois
Voir le profil de l'utilisateur Envoyer un message privé Envoyer un e-mail
 
Voir le sujet précédent Voir le sujet suivant 
Auteur Message
goOK
Bouddha Zen
Bouddha Zen


Anniversaire : 04 Juin
Zodiaque: Gémeaux
Sexe: Sexe:Homme
Inscrit le: 22 Déc 2008
Messages: 1779
Localisation: Béhobia, Pais Vasco, Spain


Citer
Posté le: Dim Mar 15, 2009 11:08
Sujet du message:
Répondre en citant


http://www.blogsdna.com/wp-content/uploads/2009/01/windows-7-run-command.png

How to Enable Run Command in Windows 7 Start Menu


1. Right Click on Windows 7 Start Menu and select Properties


http://www.blogsdna.com/wp-content/uploads/2009/01/windows-7-start-menu.png


2. Click on Customize under Start Menu tab


http://www.blogsdna.com/wp-content/uploads/2009/01/start-menu-properties.png


3. Scroll down and locate Run Command checkbox


http://www.blogsdna.com/wp-content/uploads/2009/01/enable-run-command.png


4. Check “Run Command” option to enable Run command in your Start Menu, click Ok and Apply and save settings.

That’s it, Now check your start menu and you should see Run Command


http://www.blogsdna.com/wp-content/uploads/2009/01/windows-7-start-menu-with-run-command.png


---

Voir le profil de l'utilisateur Envoyer un message privé Envoyer un e-mail
 
Downgrade Windows Media Player 12 to WMP 11 on Windows 7 Voir le sujet précédent Voir le sujet suivant 
Auteur Message
goOK
Bouddha Zen
Bouddha Zen


Anniversaire : 04 Juin
Zodiaque: Gémeaux
Sexe: Sexe:Homme
Inscrit le: 22 Déc 2008
Messages: 1779
Localisation: Béhobia, Pais Vasco, Spain


Citer
Posté le: Dim Mar 15, 2009 12:03
Sujet du message: Downgrade Windows Media Player 12 to WMP 11 on Windows 7
Répondre en citant


http://www.blogsdna.com/wp-content/uploads/2009/02/windows-media-player-11.png

Downgrade Windows Media Player 12 to WMP 11 on Windows 7


1. Download Windows Media Player 11 Installer for Windows 7

http://devrexster.googlepages.com/wmp

2. Now Type services.msc on windows 7 search bar

3. Stop Windows Media Player Network Sharing Service.

4. Take Ownership of following files

All files in “Program Files\Windows Media Player\” folder
All files starting with “wmp” in System32 folder
wmploc.dll.mui in “Sytem32\en-us\” folder

5. Now Run Windows Media Player 11 Installer

6. Now type Regedit on Start Menu Search bar

7. Delete following Registry key

HKEY_LOCAL_MACHINE\Software\Microsoft\MediaPlayer\Setup\Installed Versions“

(Don’t forget to take Backup of Registry before modifying/editing/deleting any registry key)

8. Reboot your Windows 7


http://www.blogsdna.com/wp-content/uploads/2009/02/windows-media-player-11-for-windows-7.png
Windows Media Player 11 in Widows 7 (Media Player Gadget)


---


How to Get Windows Media Player (WMP) Taskbar Toolbar Back in Windows 7 ?


http://img.photobucket.com/albums/v374/vishaal_here/WMP11_in_Win_7_Thumb.png


1. Right-click on Computer icon on desktop and select Manage, it'll open a new window. Now go to Services & Applications -> Services. You can also open the same from Administrative Tools -> Computer Management. Or you can directly open "Services" list by providing services.msc command in RUN or Startmenu search box.

Now right-click on "Windows Media Player Network Sharing" service and select "Stop". It'll stop the service.

2. Now you'll need to take ownership of following files/folders:

* "Windows Media Player" folder in "Program Files" folder
* All files starting with wmp in "Windows\System32" folder
* wmploc.dll.mui file in "Windows\System32\en-US" folder


PS: Make sure to take the backup of all above mentioned files/folders, so that you can restore them if something goes wrong.

3. Now download following ZIP file, extract it and run the extracted EXE file:

Download ZIP File

http://www.mediafire.com/?iaevtxyewxe

This installer will install WMP11 and will ask to restart your system. Select the second option to not restart the system and finish the installation.

4. Now open regedit and delete Installed Versions key under following key:

HKEY_LOCAL_MACHINE\SOFTWARE\Microsoft\MediaPlayer\Setup

If you are not familiar with registry editor, then download following ZIP file, extract it and run the extracted REG file. Its a ready-made registry script file which will automatically delete the above mentioned key:

Download Registry Script

http://www.askvg.com/wp-content/uploads/2009/02/delete_installed_versions_key.zip

5. That's it. Now restart your system and get ready to enjoy the WMP 11 version and WMP taskbar toolbar in Windows 7.


http://img.photobucket.com/albums/v374/vishaal_here/WMP_Toolbar_in_Win_7.png


---


Dernière édition par goOK le Lun Mar 16, 2009 08:15; édité 1 fois
Voir le profil de l'utilisateur Envoyer un message privé Envoyer un e-mail
 
Voir le sujet précédent Voir le sujet suivant 
Auteur Message
goOK
Bouddha Zen
Bouddha Zen


Anniversaire : 04 Juin
Zodiaque: Gémeaux
Sexe: Sexe:Homme
Inscrit le: 22 Déc 2008
Messages: 1779
Localisation: Béhobia, Pais Vasco, Spain


Citer
Posté le: Dim Mar 15, 2009 12:22
Sujet du message:
Répondre en citant

http://www.blogsdna.com/wp-content/uploads/2009/02/remote-desktop-icon.png


Enable Multiple User Access/Concurrent User Sessions For Remote Desktop on Windows 7


http://www.blogsdna.com/wp-content/uploads/2009/02/remote-desktop-on-widnows-7.png


1. Download this Concurrent sessions enabler.zip

http://www.missingremote.com/images/stories/Win7RDP/Concurrent_RDP_Win7_Beta_7000.zip


2. Extract the files from above downloaded zip file

3. Shift+ Right Click on install.cmd file and select run as administrator.

4. That’s it. You should see below screen after you have executed install.cmd


http://www.blogsdna.com/wp-content/uploads/2009/02/concurrent-user-sessionson-windows-7.jpg


---


Voir le profil de l'utilisateur Envoyer un message privé Envoyer un e-mail
 
Voir le sujet précédent Voir le sujet suivant 
Auteur Message
goOK
Bouddha Zen
Bouddha Zen


Anniversaire : 04 Juin
Zodiaque: Gémeaux
Sexe: Sexe:Homme
Inscrit le: 22 Déc 2008
Messages: 1779
Localisation: Béhobia, Pais Vasco, Spain


Citer
Posté le: Dim Mar 15, 2009 12:24
Sujet du message:
Répondre en citant


http://www.blogsdna.com/wp-content/uploads/2008/06/windows-vienna-7-logo.png

Download Remote Server Administration Tool (RSAT) For Windows 7


Remote Server Administration Tool is must required for IT Administrators and Tech Support guys to troubleshoot PC remotely in big organizations and company. With remove administration tool we can also control our home computer from office or using laptop from any remote location.

Microsoft has released a Remote Server Administration Tools for its latest upcoming Windows operating system windows 7 which enables IT administrators to manage roles and features that are installed on computers that are running Windows Server 2008 R2, Windows Server 2008, or Windows Server 2003, from a remote computer that is running Windows 7.

A complete installation instruction along with download links for Remote Server Administration Tool for windows 7 is available here:


http://www.microsoft.com/downloads/details.aspx?FamilyID=82516c35-c7dc-4652-b2ea-2df99ea83dbb&displaylang=en


---
Voir le profil de l'utilisateur Envoyer un message privé Envoyer un e-mail
 
Voir le sujet précédent Voir le sujet suivant 
Auteur Message
goOK
Bouddha Zen
Bouddha Zen


Anniversaire : 04 Juin
Zodiaque: Gémeaux
Sexe: Sexe:Homme
Inscrit le: 22 Déc 2008
Messages: 1779
Localisation: Béhobia, Pais Vasco, Spain


Citer
Posté le: Dim Mar 15, 2009 14:32
Sujet du message:
Répondre en citant


http://www.blogsdna.com/wp-content/uploads/2009/01/windows-7-take-ownership.png


1. Locate the file or folder on which you want to take ownership in windows explorer

2. Right click on file or folder and select “Properties” from Context Menu

3. Click on Security tab


http://www.blogsdna.com/wp-content/uploads/2009/01/windows-7-files-and-folder-security-tab.png


4. Click on “Advance”

5. Now click on Owner tab in Advance Security Settings for User windows


http://www.blogsdna.com/wp-content/uploads/2009/01/owner-tab-of-advance-security-settings.png


6. Click on Edit Button and select user from given Change Owner to list if user or group is not in given list then click on other users or groups. Enter name of user/group and click ok.


http://www.blogsdna.com/wp-content/uploads/2009/01/other-users-or-groups.png


8. Now select User/group and click apply and ok. (Check “Replace owner on subcontainers and objects” if you have files and folder within selected folder)

9. Click ok when Windows Security Prompt is displayed


http://www.blogsdna.com/wp-content/uploads/2009/01/window-security-prompt.png

10. Now Owner name must have changed.

11. Now click Ok to exist from Properties windows

Once you have taken the Ownership of file or folder next part comes is Granting Permissions to that file/folder or object.
How to Grant Permissions in Windows 7

1. Locate the file or folder on which you want to take ownership in windows explorer

2. Right click on file or folder and select “Properties” from Context Menu

3. Click on Edit button in Properties windows Click ok to confirm UAC elevation request.

4. Select user/group from permission windows or click add to add other user or group.

5. Now under Permission section check the rights which you want to grant i.e check “Full Control” under the “Allow” column to assign full access rights control permissions to Administrators group.


http://www.blogsdna.com/wp-content/uploads/2009/01/change-permissions.png


6. Click Ok for changes to take effect and click ok final ok to exit from Properties window.

Now you can access files of folder in windows 7 with full permissions and take full control.


---
[/img]
Voir le profil de l'utilisateur Envoyer un message privé Envoyer un e-mail
 
Voir le sujet précédent Voir le sujet suivant 
Auteur Message
goOK
Bouddha Zen
Bouddha Zen


Anniversaire : 04 Juin
Zodiaque: Gémeaux
Sexe: Sexe:Homme
Inscrit le: 22 Déc 2008
Messages: 1779
Localisation: Béhobia, Pais Vasco, Spain


Citer
Posté le: Dim Mar 15, 2009 14:35
Sujet du message:
Répondre en citant

Add Take Ownership Option in Right Click Context Menu of Windows 7


http://www.blogsdna.com/wp-content/uploads/2009/01/windows-7-take-ownership-option.png


1. Download TakeOwnership.zip

http://www.blogsdna.com/wp-content/uploads/2009/01/takeownership.zip

2. Above zip file contains two reg (registry) files InstallTakeOwnership.reg and RemoveTakeOwnership.reg.

3. Double Click on InstallTakeOwnership.reg to install Take Ownership option in context menu


http://www.blogsdna.com/wp-content/uploads/2009/01/install-take-ownership.png


http://www.blogsdna.com/wp-content/uploads/2009/01/take-ownership-option-in-right-click-context-menu.png


---
Voir le profil de l'utilisateur Envoyer un message privé Envoyer un e-mail
 
Voir le sujet précédent Voir le sujet suivant 
Auteur Message
goOK
Bouddha Zen
Bouddha Zen


Anniversaire : 04 Juin
Zodiaque: Gémeaux
Sexe: Sexe:Homme
Inscrit le: 22 Déc 2008
Messages: 1779
Localisation: Béhobia, Pais Vasco, Spain


Citer
Posté le: Dim Mar 15, 2009 14:39
Sujet du message:
Répondre en citant


http://www.blogsdna.com/wp-content/uploads/2009/01/windows-7-elevated-comand-prompt.png

Add Elevated Command Prompt Option in Right Click Context Menu


1. Downoad AddElevatedCMDtoFolder.reg file.

http://www.blogsdna.com/wp-content/uploads/2009/01/addelevatedcmdtofolder.reg

2. Right Click on AddElevatedCMDtoFolder.reg and select Merge from context menu.


http://www.blogsdna.com/wp-content/uploads/2009/01/add-elevated-cmd-to-folder.png


3. Accept UAC prompt

4. Now Right click on any folder to very “Open Command Window Here (Administrator)” option is added or not.


http://www.blogsdna.com/wp-content/uploads/2009/01/elevated-option-in-folder-context-menu.gif


---


Add Elevated Command Prompt Option in Right Click Context Menu of My Computer in Windows 7

1. Downoad AddElevatedCMDtoComputer.reg file.

2. Right Click on AddElevatedCMDtoComputer.reg and select Merge from context menu.


http://www.blogsdna.com/wp-content/uploads/2009/01/add-elevated-cmd-to-computer.png


3. Accept UAC prompt

4. Now Right click on any folder to very “Open Command Prompt (Administrator)” option is added or not.


http://www.blogsdna.com/wp-content/uploads/2009/01/elevated-option-in-my-computer-context-menu.gif


---
Voir le profil de l'utilisateur Envoyer un message privé Envoyer un e-mail
 
Voir le sujet précédent Voir le sujet suivant 
Auteur Message
goOK
Bouddha Zen
Bouddha Zen


Anniversaire : 04 Juin
Zodiaque: Gémeaux
Sexe: Sexe:Homme
Inscrit le: 22 Déc 2008
Messages: 1779
Localisation: Béhobia, Pais Vasco, Spain


Citer
Posté le: Dim Mar 15, 2009 14:46
Sujet du message:
Répondre en citant


http://www.blogsdna.com/wp-content/uploads/2009/01/install-windows-7-from-usb-flash-drive.jpg


How to Install Windows 7 From USB Drive without Windows 7 ISO DVD


How to Install Windows 7 from USB Flash Drive

Requirement:

USB Pen Drive (Min 4 GB)

Windows 7 ISO (32 bit or 64 bit)


MBRwiz Download and Extract it on your hard drive (Diskpart utility for Windows XP doesn’t detect USB drive as Disk hence we need to use this free utility to make bootable USB drive).

http://mbrwizard.com/download.shtml


---


1. Connect your USB Flash Drive to your computer Format USB drive

2. To Format USB Flash Drive Go to My Computer -> Right click on USB drive and select Format from context menu.


http://www.blogsdna.com/wp-content/uploads/2009/01/format-usb-drive.png


3. Now go to Start Menu->run->cmd (Open Command Prompt) and Type following command

convert i: /fs:ntfs (Where “I” is your USB drive latter)


http://www.blogsdna.com/wp-content/uploads/2009/01/convert-usb-flash-drive-fat32-to-ntfs.png


4. Mount Windows 7 iso as drive (You can use Freeware MagicDisc download from here : http://152.74.198.89/setup_magicdisc.exe ).

5. Type Start->run->cmd

Now dir to directory where you have extracted MBRWiz and run following commands


Citation:
mbrwiz /list (note down disk number of your USB Pen drive)

mbrwiz /disk=X /active=X (X is Disk Number of your USB Drive)

exit


http://www.blogsdna.com/wp-content/uploads/2009/01/mbrwiz.png


6. Now open another command window and type following command

Citation:
J: (Drive letter of Windows 7 iso mounted with demon tool)

CD boot

bootsect /nt60 Y: (Y is drive latter of your USB drive )


http://www.blogsdna.com/wp-content/uploads/2009/01/update-bootmgr-for-usb-pen-drive.png


7. Now copy all files from drive where you have mount Windows 7 iso

8. Now reboot your computer and press F9 to get your BIOS screen and select USB drive as your boot drive.

9. If every thing goes fine, Your Windows 7 Installation should start from your USB drive.

Source: Bwana


---


Voir le profil de l'utilisateur Envoyer un message privé Envoyer un e-mail
 
   eMule ZenZone Index du Forum -> Systèmes d'exploitation (O.S) -> Windows
 
Page 1 sur 2 Aller à la page 1, 2  Suivante
 

Sauter vers:   

Creative Commons License Gf-Portail - phpBB v2 © 2001, 2006 phpBB Group - Traduction par : phpBB-fr.com