(Devenir Membre)
   
Menu
 Le Site
 Le Forum

 
Site optimisé pour :

Qui est en ligne ?
» 0 Membre(s)
» 4 Invité(s)


[ Voir toute la liste ]

Vus dernièrement :
 
Statistiques
Sur le Forum ZenZone

Membres : 3774
Dernier Inscrit :

nicolas78

79617 Messages
dans 9887 Sujets.
 
ZenZone IRC

Pseudo :

 
{SE7EN} Centralisation de hacks et de How To pour 7
Aller à la page Précédente  1, 2
   eMule ZenZone Index du Forum -> Systèmes d'exploitation (O.S) -> Windows
Voir le sujet précédent Voir le sujet suivant 
Auteur Message
goOK
Bouddha Zen
Bouddha Zen


Anniversaire : 04 Juin
Zodiaque: Gémeaux
Sexe: Sexe:Homme
Inscrit le: 22 Déc 2008
Messages: 1779
Localisation: Béhobia, Pais Vasco, Spain


Citer
Posté le: Dim Mar 15, 2009 14:46
Sujet du message:
Répondre en citant

Rappel du dernier message de la page précédente :

http://www.blogsdna.com/wp-content/uploads/2009/01/install-windows-7-from-usb-flash-drive.jpg


How to Install Windows 7 From USB Drive without Windows 7 ISO DVD


How to Install Windows 7 from USB Flash Drive

Requirement:

USB Pen Drive (Min 4 GB)

Windows 7 ISO (32 bit or 64 bit)


MBRwiz Download and Extract it on your hard drive (Diskpart utility for Windows XP doesn’t detect USB drive as Disk hence we need to use this free utility to make bootable USB drive).

http://mbrwizard.com/download.shtml


---


1. Connect your USB Flash Drive to your computer Format USB drive

2. To Format USB Flash Drive Go to My Computer -> Right click on USB drive and select Format from context menu.


http://www.blogsdna.com/wp-content/uploads/2009/01/format-usb-drive.png


3. Now go to Start Menu->run->cmd (Open Command Prompt) and Type following command

convert i: /fs:ntfs (Where “I” is your USB drive latter)


http://www.blogsdna.com/wp-content/uploads/2009/01/convert-usb-flash-drive-fat32-to-ntfs.png


4. Mount Windows 7 iso as drive (You can use Freeware MagicDisc download from here : http://152.74.198.89/setup_magicdisc.exe ).

5. Type Start->run->cmd

Now dir to directory where you have extracted MBRWiz and run following commands


Citation:
mbrwiz /list (note down disk number of your USB Pen drive)

mbrwiz /disk=X /active=X (X is Disk Number of your USB Drive)

exit


http://www.blogsdna.com/wp-content/uploads/2009/01/mbrwiz.png


6. Now open another command window and type following command

Citation:
J: (Drive letter of Windows 7 iso mounted with demon tool)

CD boot

bootsect /nt60 Y: (Y is drive latter of your USB drive )


http://www.blogsdna.com/wp-content/uploads/2009/01/update-bootmgr-for-usb-pen-drive.png


7. Now copy all files from drive where you have mount Windows 7 iso

8. Now reboot your computer and press F9 to get your BIOS screen and select USB drive as your boot drive.

9. If every thing goes fine, Your Windows 7 Installation should start from your USB drive.

Source: Bwana


---


Voir le profil de l'utilisateur Envoyer un message privé Envoyer un e-mail
 
Voir le sujet précédent Voir le sujet suivant 
Auteur Message
goOK
Bouddha Zen
Bouddha Zen


Anniversaire : 04 Juin
Zodiaque: Gémeaux
Sexe: Sexe:Homme
Inscrit le: 22 Déc 2008
Messages: 1779
Localisation: Béhobia, Pais Vasco, Spain


Citer
Posté le: Dim Mar 15, 2009 14:53
Sujet du message:
Répondre en citant


http://www.blogsdna.com/wp-content/uploads/2009/01/windows-7-hard-disk-drive.png

Fix Missing Windows XP, Vista Hard Drive Partition in Windows 7


1. Click on start and type diskmgmt.msc on search bar (on Run command)

2. This will open the Disk Management interface that is displaying all connected hard drives and partitions.


http://www.blogsdna.com/wp-content/uploads/2009/01/windows-7-disk-manager.jpg


3. Now select Drive from lower half of your disk management interface which doesn’t have any drive letter.


http://www.blogsdna.com/wp-content/uploads/2009/01/windows7-hidden-partition.jpg


4. Right Click & Select “Change Drive Letter and Paths” from the context menu.

5. Now click on the Add button in the next menu and pick a drive letter from the pull down menu.


http://www.blogsdna.com/wp-content/uploads/2009/01/windows-7-change-drive-letter.jpg


6. Click ok to assign selected drive letter and check your windows explorer or my computer to confirm missing drive of windows XP or Vista is shown up or not.


---
Voir le profil de l'utilisateur Envoyer un message privé Envoyer un e-mail
 
Voir le sujet précédent Voir le sujet suivant 
Auteur Message
goOK
Bouddha Zen
Bouddha Zen


Anniversaire : 04 Juin
Zodiaque: Gémeaux
Sexe: Sexe:Homme
Inscrit le: 22 Déc 2008
Messages: 1779
Localisation: Béhobia, Pais Vasco, Spain


Citer
Posté le: Dim Mar 15, 2009 14:55
Sujet du message:
Répondre en citant


http://www.blogsdna.com/wp-content/uploads/2009/01/windows-experience-index-windows-7.png


Fix Low Hard drive Windows Experience Index Score/Rating on Windows 7

1. Right Click on My Computer and Select Properties from context menu.

2. Select Device manager from left pan

3. Locate your Primary Disk Drive and right click select Properties

4. Now Uncheck Enable Write Caching on Drive and Press ok


http://www.blogsdna.com/wp-content/uploads/2009/01/windows-7-enable-write-caching-on-drive.png


5. re-run your Windows Experience Index

This should fix your low hard drive score on Windows Experience Index.


---
Voir le profil de l'utilisateur Envoyer un message privé Envoyer un e-mail
 
Voir le sujet précédent Voir le sujet suivant 
Auteur Message
goOK
Bouddha Zen
Bouddha Zen


Anniversaire : 04 Juin
Zodiaque: Gémeaux
Sexe: Sexe:Homme
Inscrit le: 22 Déc 2008
Messages: 1779
Localisation: Béhobia, Pais Vasco, Spain


Citer
Posté le: Dim Mar 15, 2009 15:00
Sujet du message:
Répondre en citant


http://www.blogsdna.com/wp-content/uploads/2008/06/windows-vienna-7-logo.png

How to Change Windows 7 Product Key


How to Change windows 7 Product key

Method 1: Manual

1. Right Click on My Computer and Select Properties.

2. Wait a second for windows activation details to get populated.

3. Click on Change Product key link after your Windows 7 activation details are populated.


http://www.blogsdna.com/wp-content/uploads/2009/01/change-windows-7-product-key.png


4. Enter New Product Key and click on next to activate your windows 7


http://www.blogsdna.com/wp-content/uploads/2009/01/enter-product-key.png


---


Method 2: Command Prompt

1. Click on start and type command (cmd) with run as administrator option or check how to open elevated command prompt

http://www.blogsdna.com/2168/windows-7-how-to-open-elevated-command-prompt-with-administrator-privileges.htm

2. Now type following command

Citation:


“slmgr.vbs -ipk <insert>”

3. To activate windows after changing the key, run “slmgr.vbs -ato”


http://www.blogsdna.com/wp-content/uploads/2009/01/command-prompt-change-windows-7-prodcut-key.png


---
Voir le profil de l'utilisateur Envoyer un message privé Envoyer un e-mail
 
Voir le sujet précédent Voir le sujet suivant 
Auteur Message
goOK
Bouddha Zen
Bouddha Zen


Anniversaire : 04 Juin
Zodiaque: Gémeaux
Sexe: Sexe:Homme
Inscrit le: 22 Déc 2008
Messages: 1779
Localisation: Béhobia, Pais Vasco, Spain


Citer
Posté le: Dim Mar 15, 2009 15:04
Sujet du message:
Répondre en citant


http://www.blogsdna.com/wp-content/uploads/2009/01/patch-uxthemedll-in-windows-7.png


How to Patch Uxtheme.dll in Windows 7

1. Download Uxtheme patch Files

2. Login to Your Windows 7 with User having administrator privileges

3. Open you’re my Computer and Navigate to Following Directory

C:\Windows\system32\ (change driver letter as per your windows 7 installation)

4. Locate following three files

uxtheme.dll

themeui.dll

shsvcs.dll

5. Take Ownership of each of these files

6. Grant Full Permission to yourself on each of these files

7. Rename uxtheme.dll to uxtheme.old , themeui.dll to themeui.old & shsvcs.dll to shsvcs.old

8. Copy downloaded patch files and past in C:\Windows\system32\ directory

(change driver letter as per your windows 7 installation)

9. Reboot Your Windows 7


---

http://www.blogsdna.com/wp-content/uploads/2009/01/patch-uxthemedll-in-windows-7.png

http://www.blogsdna.com/wp-content/uploads/2009/01/uxtheme-patcher-10.png

Nirwradsoft UxTheme Patcher
is extremely small in size and supports almost all windows operating system but only 32-bit.

Download Nirwradsoft UxTheme Patcher 1.0 for Windows 7, XP & Vista.


http://www.deviantart.com/download/109295022/NiwradSoft_UxTheme_Patcher_by_Niwradsoft.zip


---
Voir le profil de l'utilisateur Envoyer un message privé Envoyer un e-mail
 
Voir le sujet précédent Voir le sujet suivant 
Auteur Message
goOK
Bouddha Zen
Bouddha Zen


Anniversaire : 04 Juin
Zodiaque: Gémeaux
Sexe: Sexe:Homme
Inscrit le: 22 Déc 2008
Messages: 1779
Localisation: Béhobia, Pais Vasco, Spain


Citer
Posté le: Lun Mar 16, 2009 10:27
Sujet du message:
Répondre en citant

http://www.blogsdna.com/wp-content/uploads/2009/03/windows-7-login-customized.png


http://www.blogsdna.com/wp-content/uploads/2009/03/customize-windows-7-logon-background.png


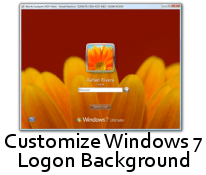
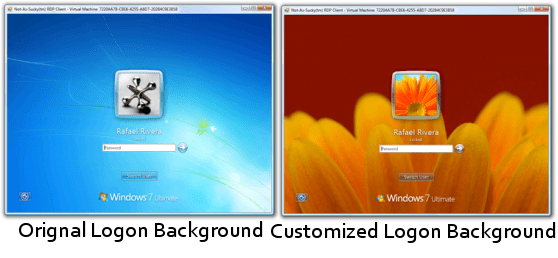
Steps to Change Windows 7 Build 7057 Logon Background Image

1. press win+r key and Type Regedit at run prompt

2. Locate following registry key

HKLM\Software\Microsoft\Windows\CurrentVersion\Authentication\LogonUI\Background

3. Now in right-side pane, change value of OEMBackground to 1.

4. Now place your custom image in %windir%\system32\oobe

5. Create a new folder info and background within newly created info folder

Folder path should look like this %windir%\System32\oobe\info\backgrounds

6. Now place your desired logon wallpaper within this background folder with file name as backgroundDefault.jpg

Images Name with resolutions

backgroundDefault.jpg

background768×1280.jpg (0.6)

background900×1440.jpg (0.625)

background960×1280.jpg (0.75)

background1024×1280.jpg (0.8)

background1280×1024.jpg (1.25)

background1024×768.jpg (1.33-)

background1280×960.jpg (1.33-)

background1600×1200.jpg (1.33-)

background1440×900.jpg (1.6)

background1920×1200.jpg (1.6)

background1280×768.jpg (1.66-)

background1360×768.jpg (1.770833-)

Please NOTE: Images must be less than 256kb in size

The backgroundDefault.jpg image is loaded and stretched-to-fit when a resolution/ratio specific background cannot be found.


---
Voir le profil de l'utilisateur Envoyer un message privé Envoyer un e-mail
 
Voir le sujet précédent Voir le sujet suivant 
Auteur Message
goOK
Bouddha Zen
Bouddha Zen


Anniversaire : 04 Juin
Zodiaque: Gémeaux
Sexe: Sexe:Homme
Inscrit le: 22 Déc 2008
Messages: 1779
Localisation: Béhobia, Pais Vasco, Spain


Citer
Posté le: Lun Mar 16, 2009 10:32
Sujet du message:
Répondre en citant

http://www.blogsdna.com/wp-content/uploads/2009/01/windows-7-dreamscene-logo.jpg


How to Install & Enable DreamScene in Windows 7


How to Install Enable DreamScene in Windows 7

1. Download Windows7-dreamscene.exe, this executable patch will automatically copy the necessary DreamScene files and merge require registry keys and entries.

http://www.ziddu.com/download/3175952/Windows7-DreamScene.exe.html

2. Now run Windows7-DreamScene.exe as Administrator to install and enable Windows DreamScene on Windows 7.


http://www.blogsdna.com/wp-content/uploads/2009/01/installing-windows-7-dreamscene.png


3. Make sure you have Enabled Aero in Windows 7 before enabling DreamScene in Windows 7.

The Windwos7-dreamscene.exe installer will copy DreamScene.dll to %WinDir%\System32 folder, DreamScene.dll.mui to %WinDir%\System32\en-US folder and will automatically add required Registry entry.


---


How to Add Video Clip, Image and apply to Windows 7 DreamScene

1. The Above Installer will create Windows DreamScene in %WinDir%\Web\ folder. You can place any video file that you want to set as DreamScene background wallpaper in this folder.

2. Now to apply any video clip as DreamScene animated wallpaper desktop background right click on Video clip and select on “Set as Desktop Background” from content menu.


http://www.blogsdna.com/wp-content/uploads/2009/01/set-dreamscene-desktop-background.jpg


Source: My Digital Life


---

Voir le profil de l'utilisateur Envoyer un message privé Envoyer un e-mail
 
Voir le sujet précédent Voir le sujet suivant 
Auteur Message
goOK
Bouddha Zen
Bouddha Zen


Anniversaire : 04 Juin
Zodiaque: Gémeaux
Sexe: Sexe:Homme
Inscrit le: 22 Déc 2008
Messages: 1779
Localisation: Béhobia, Pais Vasco, Spain


Citer
Posté le: Mer Avr 01, 2009 20:24
Sujet du message:
Répondre en citant


How to minimize MSN Messenger to the system tray in Windows 7


http://windows7center.com/wp-content/uploads/2009/02/transformation.jpg


1) Go to your MSN folder. It’s usually located at: C:\Program Files\Windows Live\Messenger

2) Right click msnmsgr.exe and select Properties


http://windows7center.com/wp-content/uploads/2009/02/properties.jpg


3) Select the Compatibility tab at the top.

4) Check Run this program in compatibility mode for: and select Windows Vista from the drop-down menu


http://windows7center.com/wp-content/uploads/2009/02/vistaselect.jpg


5) Click Apply, then OK, and you’re finished

You’ll need to completely close MSN Messenger and re-open it for changes to take place.


---
Voir le profil de l'utilisateur Envoyer un message privé Envoyer un e-mail
 
Voir le sujet précédent Voir le sujet suivant 
Auteur Message
goOK
Bouddha Zen
Bouddha Zen


Anniversaire : 04 Juin
Zodiaque: Gémeaux
Sexe: Sexe:Homme
Inscrit le: 22 Déc 2008
Messages: 1779
Localisation: Béhobia, Pais Vasco, Spain


Citer
Posté le: Mer Avr 01, 2009 20:27
Sujet du message:
Répondre en citant


How to run Google Chrome in 64-bit Windows 7 Beta


1) Right click on the Google Shortcut icon (not from the Superbar) and click on Properties

2) Select the Shortcut Tab from the Properties Window

3) Insert the following code right after chrome.exe (there are two dashes before the world in)

Citation:
—in-process-plugins


http://windows7center.com/wp-content/uploads/2009/02/chromeshortcut.jpg


Make sure that –in-process-plugins is placed outside of the quotation marks

4) Click on Apply, then OK

Google Chrome should now work properly in 64-bit Windows 7.


---
Voir le profil de l'utilisateur Envoyer un message privé Envoyer un e-mail
 
   eMule ZenZone Index du Forum -> Systèmes d'exploitation (O.S) -> Windows
 
Page 2 sur 2 Aller à la page Précédente  1, 2
 

Sauter vers:   

Creative Commons License Gf-Portail - phpBB v2 © 2001, 2006 phpBB Group - Traduction par : phpBB-fr.com